It’s been a while since I’ve given you any updates on our nursery/toddler room progress, but I assure you we have been very hard at work. We have been busy painting the room, which has been a challenge because we could only really do it when our toddler was awake and not in the room.
The colors we used (Benjamin Moore’s Revere Pewter, White Dove and Amherst Grey) are on the sophisticated side for a child’s room, but I planned on spicing it up with some fun accent colors. We considered wallpapering an accent wall, but I couldn’t find a wallpaper that was perfect for the style we were going for and for the amount it would cost to wallpaper, it had to be PERFECT.
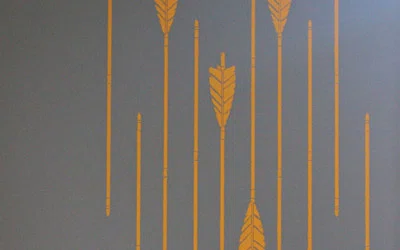
I decided to go with the method of stenciling because I could find the design style I was looking for and customize the color. I was delighted to find this arrow stencil from Olive Leaf Stencils and contacted the shop owner right away. After much deliberation, Jason and I decided to paint the arrows yellow. We also considered light blue or white.
The stencil from Olive Leaf Stencils came right away and I was impressed with the quality of the stencil from the moment I opened the package. The stencil came in a thick plastic bag and was very thick itself. It also came with very clearly written instructions, as well as advice on supplies. It was shipped in a tube, but it flattened out after just a night of laying on my dining room table.
With our stencil ready to go, I ran out to Home Depot for some basic supplies. I picked up some 3M Spray Adhesive, a high density foam roller and a quart of Behr Premium Plus Ultra Paint in Opulent. This paint has a primer in it as well, which was helpful when painting over the dark grey.
I had planned on just buying a sample of paint, as this project did not need a full quart of paint, but I didn’t realize paint samples are only available in flat finish. I wanted the arrows to have a little shine, so I sprung for the quart size of paint so I could buy a satin finish. The dark grey wall we stenciled on was in an eggshell finish, so it just helps the arrows stand out a bit more.
Once you’ve gathered all your supplies, lay your stencil flat and spray with the adhesive. Be sure to purchase a temporary spray adhesive. You don’t want the ones that boast “high tack” or “permanent.” This particular spray advised to spray from a 6-8 inch distance and to let sit for 1 minute before adhering for a temporary/removable adhesion.
After waiting 1 minute for the spray adhesive to slightly dry, I pressed the stencil to the wall. I had marked a level line with pencil where I wanted to top of the stencil to be, so it was easier to get the stencil straight. I also followed up with a level to make sure it was straight after applying. I was pleased to find I was able to adjust the stencil a few times until I achieved the exact positioning I wanted. Once I had it perfect, I secured it with a few pieces of painter’s tape.
It’s important to apply thin coats of paint so the paint doesn’t bleed through the stencil to the wall. I rolled it out evenly on the tray and then swiped it on a piece of paper towel before applying to the wall, just to make sure I didn’t have any large paint spots hiding on my roller.
Roll out the paint on top of the stencil. Try to roll out the paint as evenly as possible, but don’t worry about getting it too thick. It’s better to do multiple thin layers of paint then a few thick ones.
Here is what our stencil looked like after one coat of paint.
And this is what it looked like after the final coat of paint. It took 3-4 coats of paint, but we were also painting on a dark wall. It may only take 2-3 coats if you are painting a dark color on a light wall.
After about 15-30 minutes of your final coat you can remove the stencil. Pull the stencil slowly off the wall so as not to pull any of your wall paint off with the stencil. I didn’t have any problems with wall paint coming off.
I HIGHLY recommend Olive Leaf Stencils, as this project went MUCH better than my last stenciling attempt. I am by NO means a stencil expert and had NO problem completing this project with excellent results. I really think it is due to using the higher quality stencil as well as Olive Leaf Stencils‘ clear application instructions.
We love our arrow accent wall and our son is so excited to show all his friends when they come over! It really adds a fun element to the room. I can’t wait to add more accessories!
This post was sponsored by Olive Leaf Stencils, in that I did receive the stencil for free in exchange for a review of the product and providing application instructions. I did find Olive Leaf Stencils on my own through Etsy and loved the designs they create prior to this partnership.